Hi @Screen-Name6,
I'd like to help!
Try the below suggestions-
Step 1: Check the paper, and then reload it
Paper feed issues might result from using ripped, dusty, curled, wrinkled, or bent paper. The quality of the paper can also make a difference. Use these guidelines to help avoid the issue.
-
Use only good quality paper that meets printer specifications.
-
Store all paper in a dry, cool place. Paper feed issues occur more often in humid environments.
-
Do not print on paper that is already printed. The dampness of the ink can cause the paper to stick together.
-
Wait for the printer to complete a job or to display a Load Paper in Tray message before you load more paper.
Before you load paper in the input tray or photo tray, make sure the paper is neatly stacked and in good condition, and the paper path and tray are free from obstructions.
-
Pull the input tray toward you to open it.
-
Remove any paper from the input tray or photo tray.
-
Remove any severely bent, wrinkled, or torn paper from the stack.
-
Check for obstructions inside the input tray or photo tray. Make sure nothing blocks the paper from engaging with the rollers. Even small pieces of paper can cause paper feed issues.
-
With both hands, hold the stack of paper, and then tap the bottom edge of the stack on a flat surface so that the stack is even on all sides.
-
Insert the stack of paper into the input tray or photo tray.
-
Push the stack of paper toward the rear of the input tray or photo tray until the paper stops, and then slide the paper width guides until they lightly rest against the edges of the paper.

-
Push the input tray forward until it snaps into place.
-
The printer control panel displays the paper size loaded.
-
If the paper size loaded does not match what is displayed, select the paper tray, select your paper size and type, and then touch Done.
-
If the paper size is correct, touch OK.
Try to print. If the issue persists, continue to the next step.
Step 2: Clean the paper tray rollers under the printer
Clean the paper tray rollers underneath the printer.
-
Carefully lift the printer and set it on its side.
-
While supporting the printer with one hand, pull the paper tray or trays to expose the paper rollers underneath the printer.
-
Lightly dampen a lint-free cloth with distilled water, and then squeeze any excess liquid from the cloth.
-
Clean the rollers with the damp cloth.
-
Allow the rollers to dry completely (approximately 10 minutes).
-
Close the paper tray or trays, and then set the printer upright.
Try to print. If the issue persists, continue to the next step.
Step 3: Clean the paper feed rollers
Dust, paper fiber, and other debris might accumulate on the paper feed rollers and cause paper jams and paper feed issues. Clean the rollers inside the printer, and then try to print again.
Clean the rollers from inside the ink cartridge access area
Clean the rollers inside the ink cartridge access area.
-
Turn off the printer, and then disconnect the power cord and any other cables.
WARNING:
You must disconnect the power cord before reaching inside the printer to avoid risk of injuries or electric shock.
-
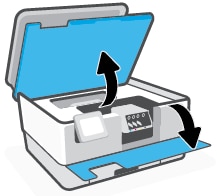
Open the front door, and then lift the ink cartridge access door.
-
Lightly dampen a lint-free cloth with the water, and then squeeze any excess liquid from the swab.
-
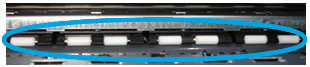
Gently clean the rollers with the damp cloth.
-
Allow the rollers to dry completely (approximately 10 minutes).
-
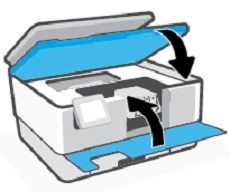
Close the ink cartridge access door, and then close the front door.
-
Reconnect the power cord and any other cables to the rear of the printer, and then turn on the printer.
Clean the rear rollers (9020 printers only)
Clean the rollers inside the rear of the printer.
-
Turn off the printer, and then disconnect the power cord and any other cables.
-
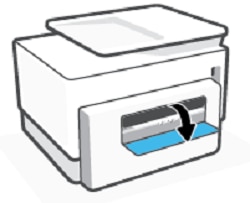
Turn the printer so that the rear access door faces you.
-
Press the tab on the rear access door and open the door.
-
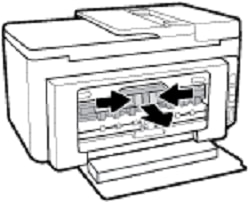
Press the two buttons on the paper path cover, and then pull the cover out of the printer.
-
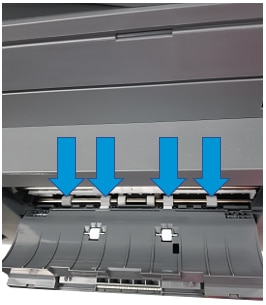
Lightly dampen a clean, lint-free cloth with distilled water, and then squeeze any excess liquid from the cloth.
-
Gently clean the rollers with the damp cloth.
-
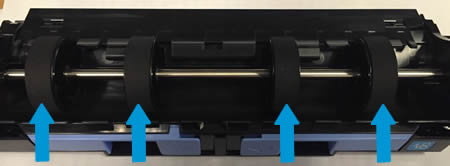
Repeat the cleaning steps on the paper path cover rollers.
-
Allow the rollers to dry completely (approximately 10 minutes).
-
Insert the paper path cover back into the printer.
-
Close the rear access door.
-
Reconnect the power cord and any other cables to the rear of the printer, and then turn on the printer.
Try to print. If the error persists, continue to the next step.
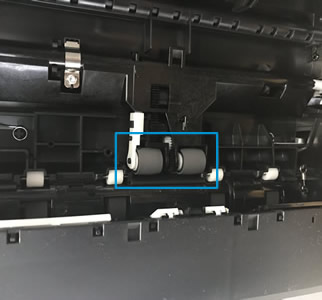
Step 4: Clean the duplexing rollers
Clean the rollers behind the ink access area of the printer.
-
Turn off the printer, and then disconnect the power cord.
WARNING:
To avoid risk of injuries or electric shock, disconnect the power cord before reaching inside the printer.
-
Open the front door, and then lift the ink cartridge access door.

-
Lightly dampen a lint-free cloth with distilled water, and then squeeze any excess liquid from the cloth.
-
Clean the rollers with the damp cloth.

-
Allow the rollers to dry completely (approximately 10 minutes).
-
Close the ink cartridge access door.
-
Reconnect the power cord to the rear of the printer, and then turn on the printer.
Try to print. If the error persists, continue to the next step.
Step 5: Reset the printer
Sometimes an error persists even though there is no paper feed issue. Reset the printer, and then try to print.
-
With the printer turned on, disconnect the power cord from the printer.
-
Unplug the power cord from the power source.
-
Wait 60 seconds.
-
Reconnect the power cord to a wall outlet and to the printer.
NOTE:
HP recommends plugging the printer directly into a wall outlet.
Hope this helps! Keep me posted.
And, Welcome to the HP Support Community.
Please click “Accept as Solution” if you feel my post solved your issue, it will help others find the solution.
Click the “Kudos, Thumbs Up" on the bottom right to say “Thanks” for helping


