-
×InformationNeed Windows 11 help?Check documents on compatibility, FAQs, upgrade information and available fixes.
Windows 11 Support Center. -
-
×InformationNeed Windows 11 help?Check documents on compatibility, FAQs, upgrade information and available fixes.
Windows 11 Support Center. -
- HP Community
- Printers
- Printing Errors or Lights & Stuck Print Jobs
- Re: Printhead problems

Create an account on the HP Community to personalize your profile and ask a question
Your account also allows you to connect with HP support faster, access a personal dashboard to manage all of your devices in one place, view warranty information, case status and more.
Check some of the most frequent questions about Instant Ink: HP INSTANT INK, HP+ PLANS: INK AND TONER.
Check out our Black or Color Ink Not Printing, Other Print Quality Issues info about: Print quality and Cartridge Issues.

It has been a while since anyone has replied. Simply ask a new question if you would like to start the discussion again.
09-14-2019 02:11 PM
 HP Recommended
Operating System: Microsoft Windows 10 (64-bit)
I've replaced printheads yet continue to get printer message to replace printheads. I've reintalled them, clean the contacts, etc. but the printer still does not work and continues to report replace printheads.
Solved! Go to Solution.
1 ACCEPTED SOLUTION
Accepted Solutions
09-24-2019 01:04 PM
HP Recommended
Replacing the printhead should resolve the issue.
I would personally suggest you contact our HP Support to get the Printhead replaced.
Click here: www.hp.com/contacthp
Keep me posted, how it goes!
If the information I've provided was helpful, give us some reinforcement by clicking the Accepted Solution and Kudos buttons, that'll help us and others see that we've got the answers!
Have a great day!
Cheers:)
Raj1788
I am an HP Employee
6 REPLIES 6
09-18-2019 07:04 PM
HP Recommended
Could you please help me with the exact model name or the product number or the printer?
Have you tried any troubleshooting steps?
Keep me posted.
Thank you for joining the HP Community.
Have a great day!
Cheers 🙂
Raj1788
I am an HP Employee
09-19-2019 08:49 AM
HP Recommended
Thanks, I've previously tried all of the solutions offered by the printer screen to no avail. It currently suggests that I replace the "MC" printhead, other times it suggests I replace the other or sometimes both. The printer is an Officejet Pro 8500A. The "KY" printhead was new in March, and I replaced it again last week. This is very frustrating. Thanks in advance for any suggestions you may have.
09-19-2019 03:25 PM
HP Recommended
Clean the electrical contacts on the printhead and inside the product
Use the following steps to clean the electrical contacts on the printheads.
-
If the error message indicates that a specific printhead is causing the error, clean only the contacts on that printhead.
-
If the error message indicates that both printheads are causing the error, clean the contacts on both printheads.
NOTE:The black/yellow printhead is located in the left printhead slot. The magenta/cyan printhead is located in the right printhead slot.
-
Press the Power button (
 ) to turn on the product, if it is not already on.
 -
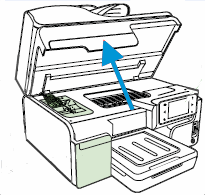
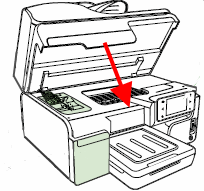
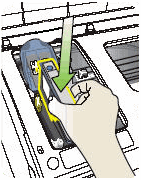
Open the carriage access door.
Figure : Open the carriage access door
-
Touch Change Printheads on the product control panel. The carriage moves to the access area on the left side of the product. Wait for the carriage to stop moving.
-
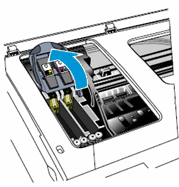
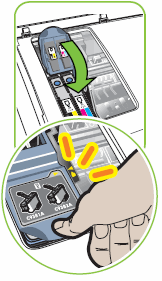
Lift the printhead latch.
Figure : Lift the printhead latch
-
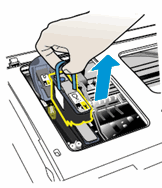
Lift the handle on the printhead, and then use the handle to pull the printhead out of its slot.
CAUTION:
The ink nozzles on the printheads might clog if you expose them to air for more than a few minutes. Clean the contacts right after removal to avoid clogging the nozzles.
Figure : Remove the printhead
-
After you have removed the printhead, disconnect the power cord from the back of the product.
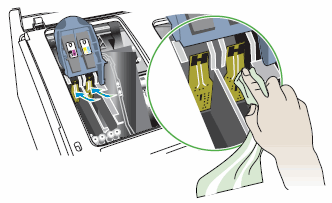
- Use a dry, soft, lint-free cloth to remove any ink from the electrical contacts on the printhead.
CAUTION:
Wipe only the electrical contacts. Wiping the ink nozzles, located on the underside of the printhead, can damage the printhead. Do not touch the nozzles. Doing so permanently damages the ink nozzles, and the ink stains clothing.
Figure : Electrical contacts and ink nozzles
-
Electrical contacts
-
Ink nozzles
-
-
Wipe the electrical contacts with the swab until no ink residue remains.
-
Wipe the electrical contacts with a fresh cloth to dry them and remove lint.
-
After the electrical contacts on the printhead are clean and dry, place the printhead on a sheet of paper or a paper towel. Make sure that the ink nozzles face up and do not touch the paper.
-
Use a fresh, dry, soft, lint-free cloth to clean the electrical contacts inside the product.
Figure : Clean the electrical contacts inside the product
-
Allow at least five minutes for the contacts to dry. Check the contacts for lint or debris, and then dry or clean the contacts again if needed.
NOTE:
Leave the carriage access door open until prompted to close it.
-
Reconnect the power cord to the back of the product.
-
If the product does not turn on automatically after reconnecting the power cord, press the Power button (
) to turn on the product. -
Insert the printhead into its color-coded slot (the label on the printhead must match the label on the printhead latch). Press down firmly on the printhead to make sure that the electrical contacts touch.
-
Repeat these steps for the remaining printheads, if necessary.
-
Pull the printhead latch all the way forward, and then press down to engage the latch.
-
Close the carriage access door. The product initializes the printheads, and then prints an alignment page.
Figure : Close the carriage access door
-
If these steps resolved the issue, you do not need to continue troubleshooting.
-
If the issue persists, continue to the next solution.
Solution three: Replace the printheads
Use the following steps to replace the printheads.
-
If the error message indicates that a specific printhead is causing the error, replace only that printhead.
-
If the error message indicates that both printheads are causing the error, replace both printheads.
NOTE:The black/yellow printhead is located in the left printhead slot. The magenta/cyan printhead is located in the right printhead slot.
-
Press the Power button (
) to turn on the product, if it is not already on. -
Open the carriage access door.
Figure : Open the carriage access door
-
Touch Change Printheads on the product control panel. The carriage moves to the access area on the left side of the product. Wait for the carriage to stop moving.
-
Lift the printhead latch.
Figure : Lift the printhead latch
-
Lift the handle on the printhead, and then use it to pull the printhead out of its slot.
Figure : Remove the printhead
-
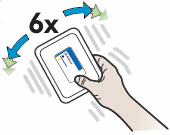
Shake the new printhead up and down at least six times while the printhead is still in its packaging.
Figure : Shake the printhead six times
-
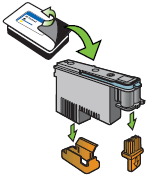
Remove the printhead from its packaging, and then remove the orange protective caps from the nozzles.
Figure : Remove the protective caps
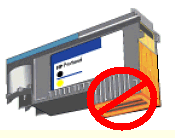
CAUTION:
Do not touch the nozzles on the printhead. Touching the nozzles can permanently damage the printhead.
Figure : Do not touch the printhead nozzles
-
Hold the printhead by its sides with the nozzles toward the product, and then insert the printhead into its color-coded slot.
-
Insert the black/yellow printhead into the slot on the left.
-
Insert the magenta/cyan printhead into the slot on the right.
Figure : Insert the printhead into its slot
-
-
If needed, repeat these steps to install the other printhead. Make sure that you shake the other printhead back and forth six times before installing it.
-
Lower the printhead latch, and then press down until the latch snaps into place.
Figure : Lower the printhead latch
-
On the product control panel display, touch Done.
-
Close the carriage access door. The product initializes the printheads and then prints the alignment pages. This could take several minutes.
Keep me posted, how it goes!
If the information I've provided was helpful, give us some reinforcement by clicking the Accepted Solution and Kudos buttons, that'll help us and others see that we've got the answers!
Have a great day!
Cheers:)
Raj1788
I am an HP Employee
09-23-2019 10:05 AM
HP Recommended
Thanks very much, I had previously tried the solution as you suggested; but did them again. My "MC" printhead still does not work. I'm going to order a new one. The "BY", which is brand new, appears to be ok, according to the printer. Hopefuly that will resolve the problem. If you have additional comments, I welcome them. Thanks.
09-24-2019 01:04 PM
HP Recommended
Replacing the printhead should resolve the issue.
I would personally suggest you contact our HP Support to get the Printhead replaced.
Click here: www.hp.com/contacthp
Keep me posted, how it goes!
If the information I've provided was helpful, give us some reinforcement by clicking the Accepted Solution and Kudos buttons, that'll help us and others see that we've got the answers!
Have a great day!
Cheers:)
Raj1788
I am an HP Employee
Be alert for scammers posting fake support phone numbers and/or email addresses on the community.
If you think you have received a fake HP Support message, please report it to us by clicking on "Flag Post".
† The opinions expressed above are the personal opinions of the authors, not of HP. By using this site, you accept the Terms of Use and Rules of Participation.


Didn't find what you were looking for?
Ask the community
† The opinions expressed above are the personal opinions of the authors, not of HP. By using this site, you accept the <a href="https://www8.hp.com/us/en/terms-of-use.html" class="udrlinesmall">Terms of Use</a> and <a href="/t5/custom/page/page-id/hp.rulespage" class="udrlinesmall"> Rules of Participation</a>.