-
×InformationNeed Windows 11 help?Check documents on compatibility, FAQs, upgrade information and available fixes.
Windows 11 Support Center. -
-
×InformationNeed Windows 11 help?Check documents on compatibility, FAQs, upgrade information and available fixes.
Windows 11 Support Center. -
- HP Community
- Printers
- Printing Errors or Lights & Stuck Print Jobs
- my printer cannot align printheads - unable to print anymore...

Create an account on the HP Community to personalize your profile and ask a question
Your account also allows you to connect with HP support faster, access a personal dashboard to manage all of your devices in one place, view warranty information, case status and more.
Check some of the most frequent questions about Instant Ink: HP INSTANT INK, HP+ PLANS: INK AND TONER.
Check out our Black or Color Ink Not Printing, Other Print Quality Issues info about: Print quality and Cartridge Issues.

It has been a while since anyone has replied. Simply ask a new question if you would like to start the discussion again.
01-12-2019 04:06 PM
 HP Recommended
Product: HP ENVY 5640
Operating System: Microsoft Windows 8 (64-bit)
I got a message saying black ink was low. Eventually it was unable to print anything so I replaced the black cartridge wtih a new HP ink cartridge. But since then it's never successfully aligned printheads. I put in blank paper. Didn't work. I tried reinstalling the drivers and also no change.
It was working fine until a couple days ago when the ink level warning prompted this whole series of events.
Help??!
Solved! Go to Solution.
1 ACCEPTED SOLUTION
Accepted Solutions
01-14-2019 08:48 AM
HP Recommended
Welcome to the HP Forums 🙂 I would like to take a moment and thank you for using this forum, it is a great place to find answers. For you to have the best experience on the HP forum, you could also visit our HP Forums Guide for First Time Here? Learn How to Post and More. I see from your post that you're having issues with the printer not printing after replacing the ink cartridges on your HP Envy 5640 printer. Don't worry we'll work together to help you find a solution.
To provide you with an accurate solution, I'll need a few more details:
Have you tried to clean the ink cartridge contacts as well as the printhead?
Have you tried to Evaluate the alignment page?
In the meantime, let's try these steps here:
Please make sure that the printer is connected directly to the wall outlet and not to the surge protector.
Remove all the ink cartridges and then try to perform a hard reset on the printer.
With the printer turned on, disconnect the power cord from the rear of the printer and also unplug the power cord from the wall outlet.
Remove USB cable, if present.
Wait for 2-3 minutes, press and hold the power button on your printer for about 30 seconds to remove any additional charge.
Now plug back the power cable straight to a wall outlet without any surge protector or an extension cord and then plug back the power cord to the printer.
Turn on the printer and wait till warm-up period finishes and the printer is idle.
Now insert the ink cartridges and then try to print a test page and check if it works.
Solution three: Clean the electrical contacts
If the electrical contacts on the cartridges and inside the cartridge slots have ink or debris buildup, the printer might not recognize the cartridges, or there might be a cartridge failure.
-
Gather the following materials:
-
Dry foam-rubber swabs, lint-free cloth, or any soft material that does not come apart or leave fibers (coffee filters work well)
-
Distilled, filtered, or bottled water (tap water might contain contaminants that can damage the cartridges)
CAUTION:
Do not use platen cleaners or alcohol to clean the cartridge contacts. These can damage the cartridge or the printer.
-
-
Press the Power button to turn on the printer, if it is not already on.
-
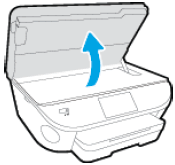
Open the cartridge access door by placing two fingers under one or both of the small handles on the sides of the cartridge access door and then lifting it up.
Figure : Open the cartridge access door
The Door Open screen displays on the printer control panel with the message, 'The cover or door must be closed to print. Check that it is completely closed.' A Change Ink option also displays on the bottom right corner of the touchscreen. You do not need to select this option at this time.
-
Disconnect the power cord from the rear of the printer.
WARNING:
You must disconnect the power cord before reaching inside the printer to avoid the risk of injuries or electric shock.
-
Disconnect the USB cable, if the printer is connected to your computer with a USB connection.
-
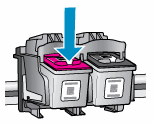
Lightly press down on one of the cartridges to release it, and then pull the cartridge toward you out of its slot.
Figure : Press down to remove the cartridge
CAUTION:
Do not remove both cartridges at the same time. Remove and clean each cartridge one at a time. Do not leave a cartridge outside the printer for more than 30 minutes.
-
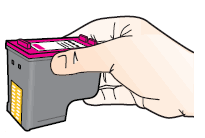
Hold the cartridge by its sides.
Figure : Hold the cartridge by its sides
-
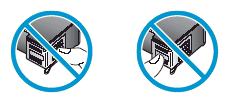
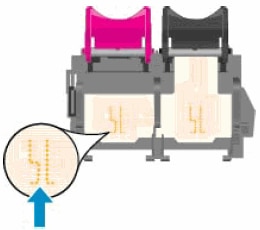
Inspect the ink cartridge contacts for ink and debris buildup.
CAUTION:
Do not touch the copper-colored contacts or the ink nozzles. Touching these parts can result in clogs, ink failure, and bad electrical connections.
Figure : Do not touch the contacts or nozzles
-
Lightly moisten a foam-rubber swab or lint-free cloth with distilled water, and then squeeze any excess water from it.
-
Clean only the copper-colored contacts on the cartridge, and then allow the cartridge to dry for about 10 minutes.
Figure : Clean the contacts
-
Copper-colored contacts
-
Ink nozzles (do not clean)
-
-
Lightly moisten another foam-rubber swab or lint-free cloth with distilled water, and then squeeze any excess water from it.
-
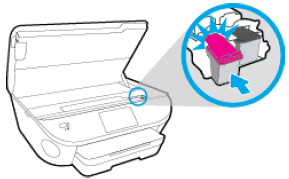
Use the swab or cloth to clean the electrical contacts in the cartridge slots, located inside the carriage in the printer.
Figure : Clean the electrical contacts in the cartridge slots
-
Allow the carriage contacts to dry for about 10 minutes.
-
Reinsert the cartridge by sliding it at a slight upward angle into the empty slot, and then gently pushing up on the cartridge until it snaps into place.
-
Reinsert the tri-color cartridge into the left slot.
-
Reinsert the black cartridge into the right slot.
Figure : Reinsert the cartridge
-
-
Repeat these steps to clean the contacts for the other cartridge.
-
Close the cartridge access door. When the door is completely closed, the Door Open screen with the message, 'The cover or door must be closed to print. Check that it is completely closed.' disappears, and the printer returns to the Home screen.
Figure : Close the cartridge access door

-
Reconnect the power cord to the rear of the printer.
-
Reconnect the USB cable, if the printer is connected to your computer with a USB connection.
-
Press the Power button to turn on the printer, if it does not turn on automatically.
Step 6: Clean the printhead or ink cartridge
Cleaning the printhead or ink cartridge often resolves alignment issues and helps resolve print quality problems at the same time. HP offers two general inkjet printhead designs: the Integrated Printhead (IPH) is integrated into the ink cartridge, and the Individual Ink Cartridges (IIC) has a printhead built into the printer.
Your printer comes with an automated tool to clean the printhead. There are several ways to access the tool, depending on your printer and the software you are using.
Run the cleaning test using one of the following methods that works for your printer and wait until the test completes.
-
If your printer has a display, go to the Settings or Tools menu to find and run printhead or ink cartridge cleaning.
-
In HP Print Assistant for Windows, find and run the cleaning test from the Maintain Your Printer section.
-
In HP Solution Center for Windows, find and run the cleaning test from the Printer Toolbox.
-
In the HP Printer Utility for Mac, find and run the cleaning test from the Information and Support panel.
Step 4: Evaluate the alignment page
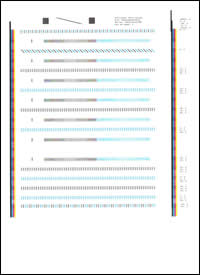
Examine the alignment page to see if the printer is properly aligned.
If the printer seems to be printing an alignment page, but the printed page is blank or has very little ink, skip to the step to Check the ink levels.
NOTE:Your alignment test page might be different from the one pictured, but the steps are the same.
Figure : Example of an Alignment test page
Could you please respond to this post with the details and with the results of the troubleshooting as this will help me in further assisting you.
Eagerly waiting for your response!
that said, If the information I've provided was helpful,
give us some reinforcement by clicking the solution and kudos buttons,
that'll help us and others see that we've got the answers!
Good Luck.
Jeet_Singh
I am an HP Employee
3 REPLIES 3
01-14-2019 08:48 AM
HP Recommended
Welcome to the HP Forums 🙂 I would like to take a moment and thank you for using this forum, it is a great place to find answers. For you to have the best experience on the HP forum, you could also visit our HP Forums Guide for First Time Here? Learn How to Post and More. I see from your post that you're having issues with the printer not printing after replacing the ink cartridges on your HP Envy 5640 printer. Don't worry we'll work together to help you find a solution.
To provide you with an accurate solution, I'll need a few more details:
Have you tried to clean the ink cartridge contacts as well as the printhead?
Have you tried to Evaluate the alignment page?
In the meantime, let's try these steps here:
Please make sure that the printer is connected directly to the wall outlet and not to the surge protector.
Remove all the ink cartridges and then try to perform a hard reset on the printer.
With the printer turned on, disconnect the power cord from the rear of the printer and also unplug the power cord from the wall outlet.
Remove USB cable, if present.
Wait for 2-3 minutes, press and hold the power button on your printer for about 30 seconds to remove any additional charge.
Now plug back the power cable straight to a wall outlet without any surge protector or an extension cord and then plug back the power cord to the printer.
Turn on the printer and wait till warm-up period finishes and the printer is idle.
Now insert the ink cartridges and then try to print a test page and check if it works.
Solution three: Clean the electrical contacts
If the electrical contacts on the cartridges and inside the cartridge slots have ink or debris buildup, the printer might not recognize the cartridges, or there might be a cartridge failure.
-
Gather the following materials:
-
Dry foam-rubber swabs, lint-free cloth, or any soft material that does not come apart or leave fibers (coffee filters work well)
-
Distilled, filtered, or bottled water (tap water might contain contaminants that can damage the cartridges)
CAUTION:
Do not use platen cleaners or alcohol to clean the cartridge contacts. These can damage the cartridge or the printer.
-
-
Press the Power button to turn on the printer, if it is not already on.
-
Open the cartridge access door by placing two fingers under one or both of the small handles on the sides of the cartridge access door and then lifting it up.
Figure : Open the cartridge access door
The Door Open screen displays on the printer control panel with the message, 'The cover or door must be closed to print. Check that it is completely closed.' A Change Ink option also displays on the bottom right corner of the touchscreen. You do not need to select this option at this time.
-
Disconnect the power cord from the rear of the printer.
WARNING:
You must disconnect the power cord before reaching inside the printer to avoid the risk of injuries or electric shock.
-
Disconnect the USB cable, if the printer is connected to your computer with a USB connection.
-
Lightly press down on one of the cartridges to release it, and then pull the cartridge toward you out of its slot.
Figure : Press down to remove the cartridge
CAUTION:
Do not remove both cartridges at the same time. Remove and clean each cartridge one at a time. Do not leave a cartridge outside the printer for more than 30 minutes.
-
Hold the cartridge by its sides.
Figure : Hold the cartridge by its sides
-
Inspect the ink cartridge contacts for ink and debris buildup.
CAUTION:
Do not touch the copper-colored contacts or the ink nozzles. Touching these parts can result in clogs, ink failure, and bad electrical connections.
Figure : Do not touch the contacts or nozzles
-
Lightly moisten a foam-rubber swab or lint-free cloth with distilled water, and then squeeze any excess water from it.
-
Clean only the copper-colored contacts on the cartridge, and then allow the cartridge to dry for about 10 minutes.
Figure : Clean the contacts
-
Copper-colored contacts
-
Ink nozzles (do not clean)
-
-
Lightly moisten another foam-rubber swab or lint-free cloth with distilled water, and then squeeze any excess water from it.
-
Use the swab or cloth to clean the electrical contacts in the cartridge slots, located inside the carriage in the printer.
Figure : Clean the electrical contacts in the cartridge slots
-
Allow the carriage contacts to dry for about 10 minutes.
-
Reinsert the cartridge by sliding it at a slight upward angle into the empty slot, and then gently pushing up on the cartridge until it snaps into place.
-
Reinsert the tri-color cartridge into the left slot.
-
Reinsert the black cartridge into the right slot.
Figure : Reinsert the cartridge
-
-
Repeat these steps to clean the contacts for the other cartridge.
-
Close the cartridge access door. When the door is completely closed, the Door Open screen with the message, 'The cover or door must be closed to print. Check that it is completely closed.' disappears, and the printer returns to the Home screen.
Figure : Close the cartridge access door
-
Reconnect the power cord to the rear of the printer.
-
Reconnect the USB cable, if the printer is connected to your computer with a USB connection.
-
Press the Power button to turn on the printer, if it does not turn on automatically.
Step 6: Clean the printhead or ink cartridge
Cleaning the printhead or ink cartridge often resolves alignment issues and helps resolve print quality problems at the same time. HP offers two general inkjet printhead designs: the Integrated Printhead (IPH) is integrated into the ink cartridge, and the Individual Ink Cartridges (IIC) has a printhead built into the printer.
Your printer comes with an automated tool to clean the printhead. There are several ways to access the tool, depending on your printer and the software you are using.
Run the cleaning test using one of the following methods that works for your printer and wait until the test completes.
-
If your printer has a display, go to the Settings or Tools menu to find and run printhead or ink cartridge cleaning.
-
In HP Print Assistant for Windows, find and run the cleaning test from the Maintain Your Printer section.
-
In HP Solution Center for Windows, find and run the cleaning test from the Printer Toolbox.
-
In the HP Printer Utility for Mac, find and run the cleaning test from the Information and Support panel.
Step 4: Evaluate the alignment page
Examine the alignment page to see if the printer is properly aligned.
If the printer seems to be printing an alignment page, but the printed page is blank or has very little ink, skip to the step to Check the ink levels.
NOTE:Your alignment test page might be different from the one pictured, but the steps are the same.
Figure : Example of an Alignment test page
Could you please respond to this post with the details and with the results of the troubleshooting as this will help me in further assisting you.
Eagerly waiting for your response!
that said, If the information I've provided was helpful,
give us some reinforcement by clicking the solution and kudos buttons,
that'll help us and others see that we've got the answers!
Good Luck.
Jeet_Singh
I am an HP Employee
01-15-2019 10:52 PM
HP Recommended
I tried the hard reset - taking out the cartridges and unplugging everything; waiting 5 minutes and then turning power back on, replacing cartridges.
I've been able to print 5 pages OK so far. thank you very much
Be alert for scammers posting fake support phone numbers and/or email addresses on the community.
If you think you have received a fake HP Support message, please report it to us by clicking on "Flag Post".
† The opinions expressed above are the personal opinions of the authors, not of HP. By using this site, you accept the Terms of Use and Rules of Participation.


Didn't find what you were looking for?
Ask the community
† The opinions expressed above are the personal opinions of the authors, not of HP. By using this site, you accept the <a href="https://www8.hp.com/us/en/terms-of-use.html" class="udrlinesmall">Terms of Use</a> and <a href="/t5/custom/page/page-id/hp.rulespage" class="udrlinesmall"> Rules of Participation</a>.