• ×
    Information
    Need Windows 11 help?
    Check documents on compatibility, FAQs, upgrade information and available fixes.
    Windows 11 Support Center.
  • post a message
  • ×
    Information
    Need Windows 11 help?
    Check documents on compatibility, FAQs, upgrade information and available fixes.
    Windows 11 Support Center.
  • post a message
Guidelines
Experiencing 'Printer Blocked' or 'Printer Error' message? Click here for more information.
Check some of the most frequent questions about Instant Ink: HP INSTANT INK, HP+ PLANS: INK AND TONER.


Check out our Black or Color Ink Not Printing, Other Print Quality Issues info about: Print quality and Cartridge Issues.
HP Recommended
HP Officejet Pro 8610
Microsoft Windows 10 (32-bit)

I printed several pages of a document without any issue. I then tried to print a few pages I had missed and the printer "printed" several blank pages. I tried printing them again and received an error code that said:Missing or Failed Printhead: The printhead appears to be missing, not detected, or incorrectly installed. Error Code: Oxc19a0013

I followed the troubleshooting suggestions of turning the printer off and then back on a few times. I carefully removed the printhead and placed it back in. Nothing has worked. My product is no longer under warranty.

Prior to receiving the error message, my printer has worked flawlessly.


4 REPLIES 4
HP Recommended

Hi! @Lorileach, Thanks for stopping by the HP Support Forums!


Don't worry I'll try to help you out.


Did you make any changes to your printer?


Please share the operating system you are running on the PC to assist you better.


Excellent description and a great diagnosis done. It is greatly appreciated.


Let's try some troubleshooting steps below and see if that works.


Reset the printer


Follow these steps to reset the printing mechanism.

  1. Turn the printer on, if it is not already on.

  2. Wait until the printer is idle and silent before you continue.

  3. With the printer turned on, disconnect the power cord from the rear of the printer.

  4. Unplug the power cord from the wall outlet.

  5. Wait at least 60 seconds.

  6. Plug the power cord back into the wall outlet.

    NOTE: 

    HP recommends connecting the printer power cord directly to the wall outlet.

  7. Reconnect the power cord to the rear of the printer.

  8. Turn on the printer, if it does not automatically turn on.

  9. Wait until the printer is idle and silent before you proceed.

Reseat the printhead three times.


Follow these steps to reseat the printhead.

NOTE: 

You do not need to remove the printhead from the carriage.

Step 1: Unseat the printhead

  1. Slip your fingers into the slot on the left side of the printer, and then pull forward to open the cartridge access door. The carriage moves to the left side of the printer. Wait until the carriage is idle and silent before proceeding.

    Figure : Open the cartridge access door

    1. Slot on the left side of the printer

  2. Unplug the power cord from the rear of the printer. Unplugging the printer prevents the carriage from moving.

       WARNING: 

    You must disconnect the power cord before reaching inside the printer to avoid risk of injuries or electric shock.

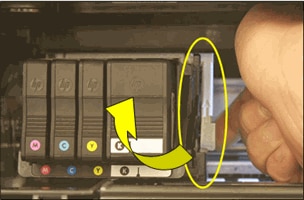
  3. Lift the carriage latch.

    Figure : Lift the carriage latch

    Image: Lift the carriage latch.
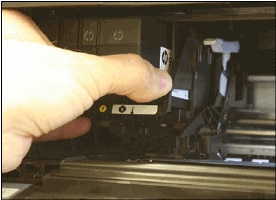
  4. Grasp the sides of the printhead, and then slightly lift the printhead without fully removing it from the carriage.

    Figure : Slightly lift the printhead

    Image: Slightly lift the printhead.

Step 2: Reseat the printhead, and then lower the carriage latch

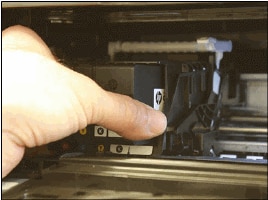
  1. Reinsert the printhead into the carriage to reseat it. As you guide the printhead into the carriage, it settles into the carriage as it seats.

    Figure : Reseat the printhead

    Image: Reseat the printhead.
  2. Gently rock the printhead to the left and right to make sure that the printhead fully seats in the carriage.

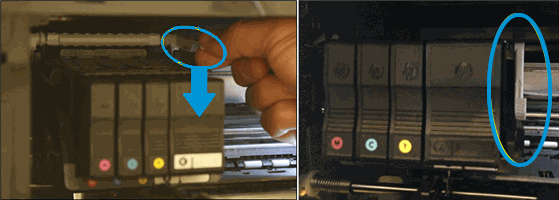
  3. Lower the carriage latch.

    Figure : Lower the carriage latch

    Image: Lower the carriage latch.
  4. Make sure that the carriage latch is down.

    Figure : Carriage latch positions

    1. Carriage latch is up

    2. Carriage latch is down

  5. Close the ink cartridge access door.

  6. Reconnect the power cord to the rear of the printer.

  7. If the printer does not turn on by itself, press the Power button to turn it on.

  8. Wait until the warm-up period finishes and your printer is idle and silent before you proceed.

Also, try updating the printer firmware and check if it helps.


Update the printer firmware using this link. Click Here 


Refer this article to further troubleshoot print head issues with your printer. Click Here


If the issue still persists after trying out the steps. It is a hardware issue with your printer.


Please contact HP phone support for service options. Click Here


Hope this helps!

Have a beautiful day ahead! 🙂


Please click “Accept as Solution” if you feel my post solved your issue, it will help others find the solution.

Click the “Kudos, Thumbs Up" on the bottom right to say “Thanks” for helping!

A4Apollo
I am an HP Employee

HP Recommended

Unfortunately none of the troubleshooting helped, including updating the firmware. I looked at the cost to replace the printhead and it is as much as buying a new printer. I really like HP printers, but they just don't last very long ;(

HP Recommended

@Lorileach,


This situation will need some additional support from our internal teams in HP. For that to happen, we will give you additional instructions/information via PM. 


Regards

Mr.Robot
 

A4Apollo
I am an HP Employee

HP Recommended


A4Apollo
I am an HP Employee

† The opinions expressed above are the personal opinions of the authors, not of HP. By using this site, you accept the <a href="https://www8.hp.com/us/en/terms-of-use.html" class="udrlinesmall">Terms of Use</a> and <a href="/t5/custom/page/page-id/hp.rulespage" class="udrlinesmall"> Rules of Participation</a>.